This guide will show you how to convert a P30SK or P30SKS from V3 (DA/SA) to LEM (including V0, V1, V2, V4, V4.1CH, and V-TGS.) Though not officially supported by HK, it's an easy conversion that you can do yourself with a few parts and tools.
There is no official LEM kit for the P-series pistols (due to HK's position on LEM conversions on P-series pistols) but parts can be obtained individually from HK Customer Service, Brownells, MidwestGunWorks, TopGunSupply, Numrich, or HKParts.net. HK Customer Service (706-568-1906) usually have the best prices available.
If you reside within the state of Texas and would like to perform this conversion but feel uneasy about taking apart the pistol and putting everything back together, send me a PM. I might be able to offer some assistance.
Abbreviations
HS = Hammer Spring
FP = Firing Pin
FPS = Firing Pin Spring
FPBS = Firing Pin Block Spring
TRS = Trigger Rebound Spring
TBDS = Trigger Bar Detent Spring
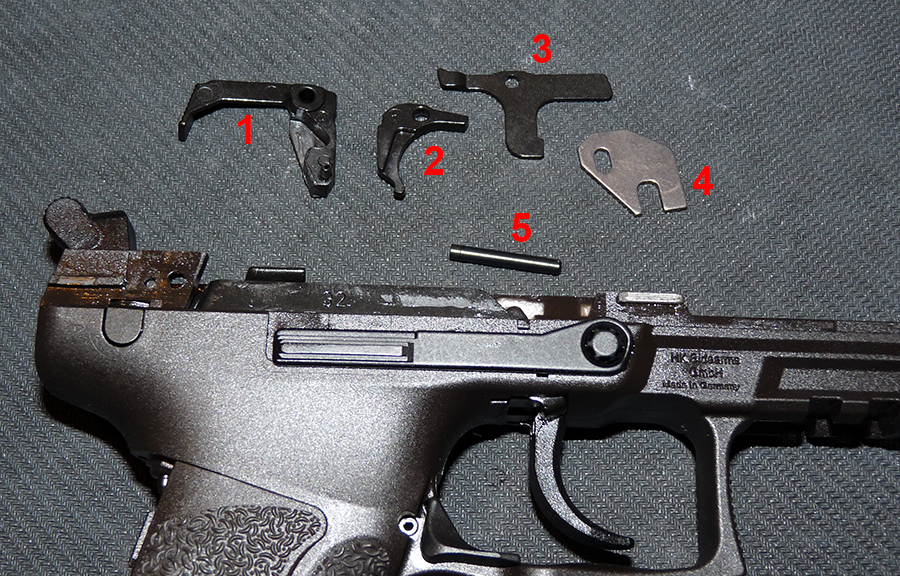
REQUIRED PARTS
1. LEM Bobbed Hammer (209321)
2. LEM Sear - aka Release Catch (209320)
3. LEM Cocking Piece (209265)
4. LEM Control Latch/Lever (209274)
5. LEM Cocking Piece Spring - aka Elbow Spring for Hammer (209275)

V0 LEM (Decocker with a spurred LEM Hammer) option
• Buy the Spurred LEM Hammer (209262)
• Keep the TRS, and Sear from your V3 (DA/SA) pistol
• You will not need the LEM Sear (209320) or bobbed LEM Hammer (209321) as indicated in the parts list above
Below is a photo of the spurred LEM hammer.

V1 LEM (Light LEM) option
• Keep the stock V3 Firing Pin Block Spring (FPBS)
• Keep the stock V3 Elbow Spring for Trigger (TRS)
V2 LEM (Heavy LEM) option
• Keep the V3 (DA/SA) Firing Pin Block Spring (FPBS)
• Buy the Heavy Elbow Spring for Trigger (Heavy TRS - 234405)
V4.1CH LEM (Swiss LEM) option
• You will not need the LEM Bobbed Hammer (209321)
• Keep the V3 (DA/SA) Firing Pin Block Spring (FPBS)
• Buy the V4.1CH LEM Kit (3 separate parts)
• Keep the stock Elbow Spring for Trigger (aka Trigger Rebound Spring or TRS) or buy the Medium TRS (234773) if you want a more positive reset but heavier trigger pull
Regardless of which LEM variant you are converting to, keep the stock Hammer Spring as there is only one spring available for the P30SK series.
Optional Parts
• If you want to reduce the trigger pull weight by an additional 1/2 to 1 lb, replace the stock FPBS with a Light FPBS (209296). A tutorial on how to detail strip the P30SK slide can be found here. Note that you do not need to detail strip the slide to replace the FPBS but due to the recent introduction of the extra Firing Pin Safety on the P30SK, follow the steps in the tutorial to remove and re-install the FPBS correctly
• If you want a clean, crispy trigger break, swap the stock Flat Sear Spring with a Match Nickel-Plated Flat Sear Spring (215691)
Notes on V4.1CH LEM
• You must swap the stock Trigger Bar Detent Spring (TBDS) with the V4.1 TBDS. The stock TBDS does not have enough tension to push up on the Trigger Bar, due to the changed geometry of the V4.1 Hammer and V4.1 Catch. Using the stock TBDS may cause the trigger not resetting properly. If you encounter the trigger reset issue as described in this video, it is caused by using the stock TBDS instead of the V4.1 TBDS.
• If you want V4.1CH LEM with the same V1 Light LEM trigger pull, keep the stock V3 TRS.
• The Medium TRS (234773) is about 0.8 lbs heavier than the stock V3 TRS and is the proper spring for factory V4.1CH LEM
Below are some pictures of the V4.1CH LEM parts and comparison of standard LEM parts versus V4.1CH LEM Parts.
V4.1CH LEM SPECIFIC PARTS
• V4.1 Hammer (207934)
• V4.1 Catch (207933)
• V4.1 Trigger Bar Detent Spring (207932)
• V4/V4.1 Medium-weight TRS (234773) <-- this spring is optional


Comparison of the standard LEM Hammer & Catch versus the V4.1CH LEM Hammer & Catch

Comparison of the stock Trigger Rebound Spring versus V4/V4.1 Trigger Rebound Spring

Comparison of the stock Trigger Bar Detent Spring and V4.1 Trigger Bar Detent Spring
Tools that you'll need
• Dental pick
• 1/16 roll-pin punch (if yours is a P30SKS)
• 3/32 roll-pin punch
• 1/8 punch (optional)
• Small hammer or mallet
If you are going to convert to a V2, V-TGS, V4, or V4.1CH LEM, you will need to swap the TRS and, therefore, will need these tools:
• 1/16 punch
• A pair of thin, needle-nose pliers or the TRS Tool from HKParts (highly recommended)

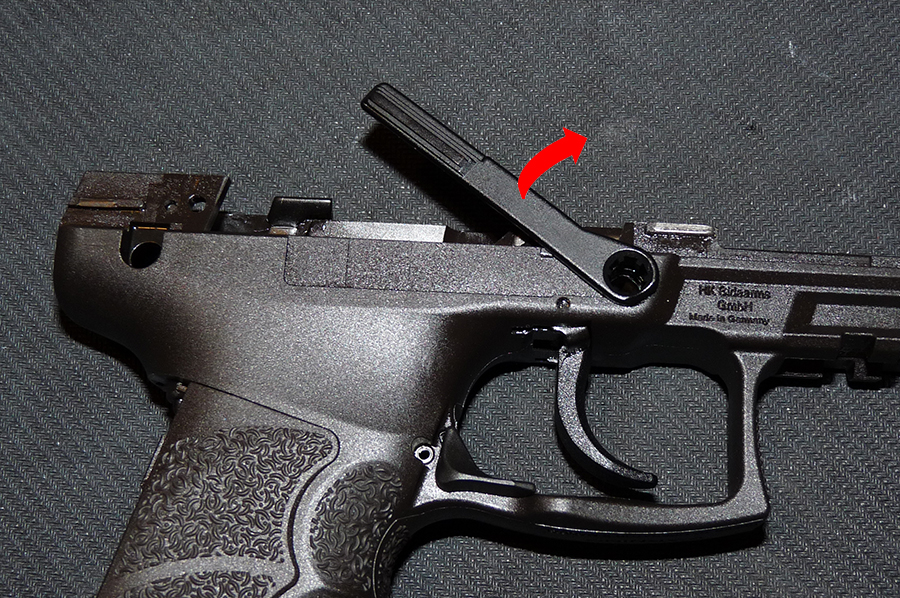
Step 1
• Remove the magazine and perform a safety check to make sure the gun is safe and unloaded
• Remove the slide

Step 2
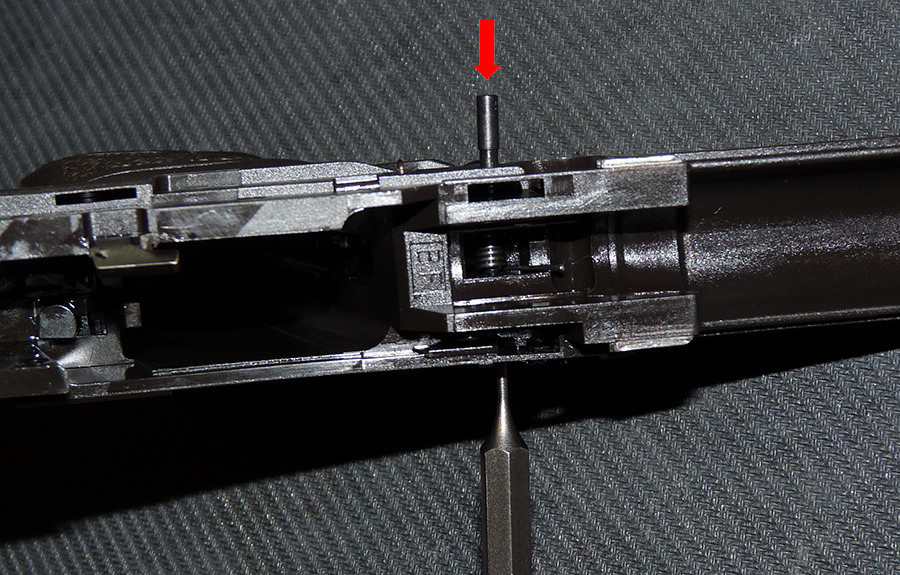
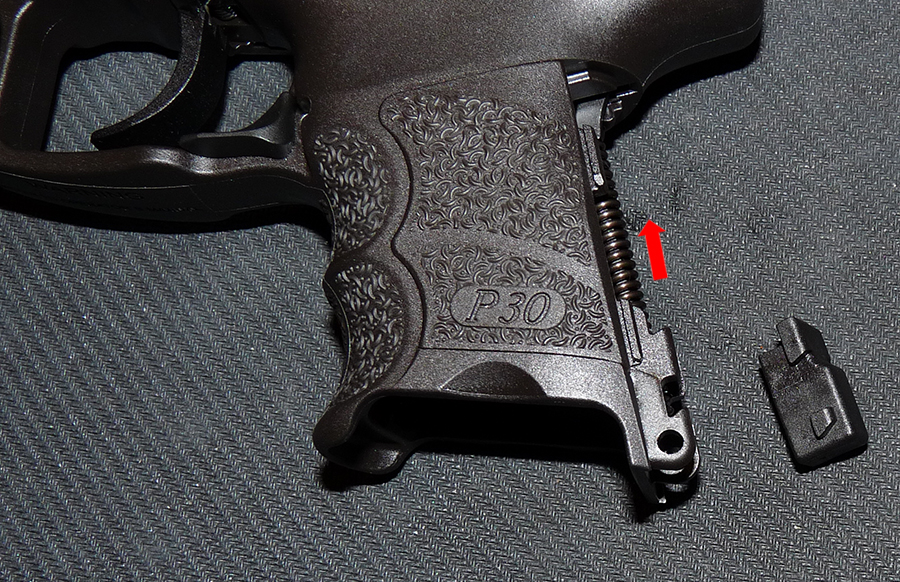
• Use the 3/32 roll-pin punch to drive out the roll pin that holds the backstrap. You can use a regular punch but a roll-pin punch will not deform the pin.
• Remove the roll-pin and backstrap


Step 3
• Use the butt of a punch and push up on the Grip Insert to dislodge it from the frame
• Remove the Grip Insert and Hammer Spring

Parts identification
1. Hammer Spring
2. Grip Insert
3. Roll-Pin

Step 4
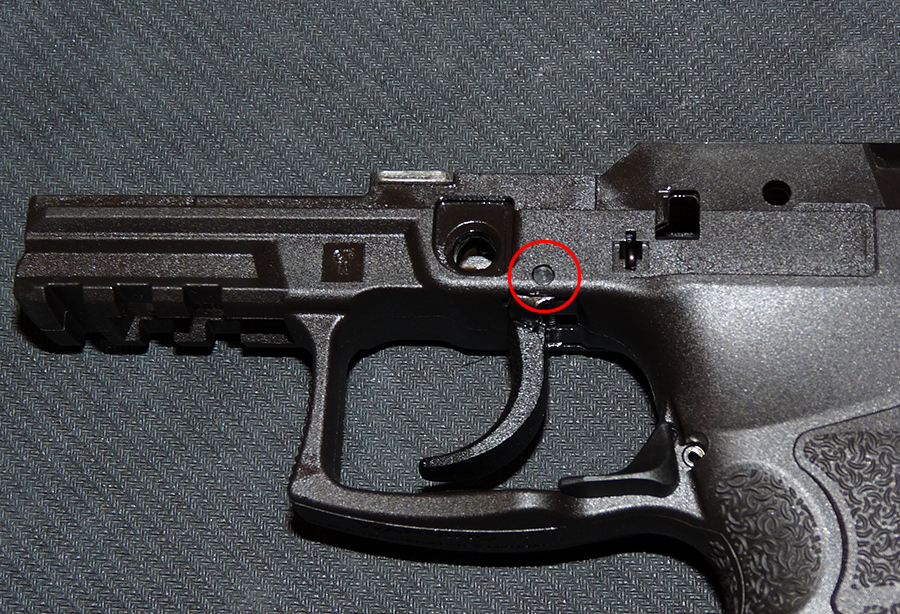
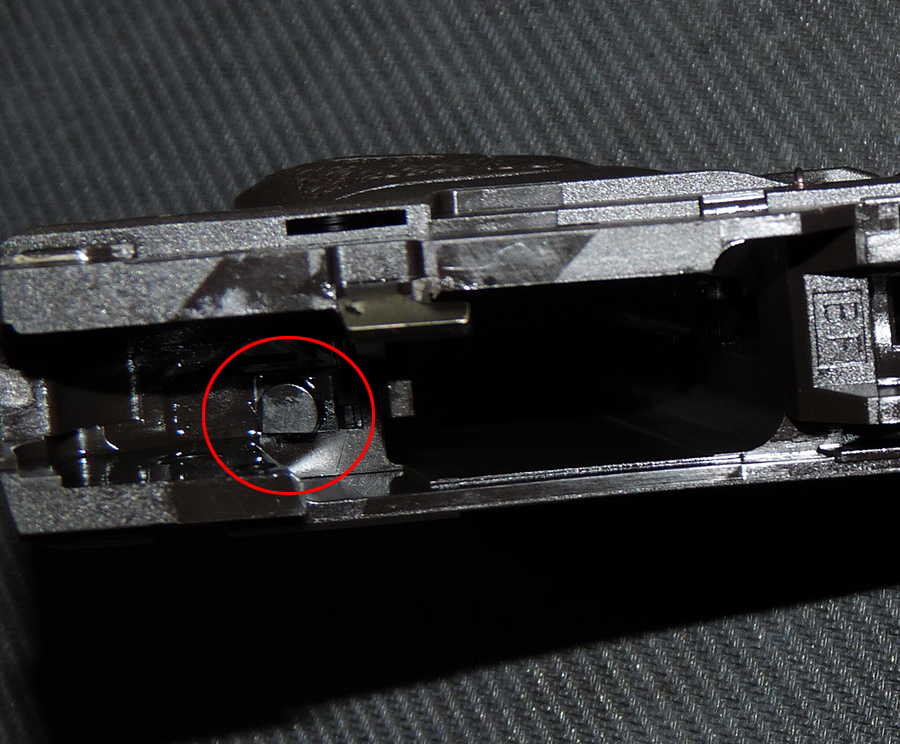
• Flip the frame over and lay it on its left side. Then locate the Sear Axle (circled in Red)
• Using the 3/32 punch, push the Sear Axle from the right side of the frame to the left. This step is important because the P30 Sear Axle is directional. Forcing it out from the other direction will cause damage to your frame!

Step 5
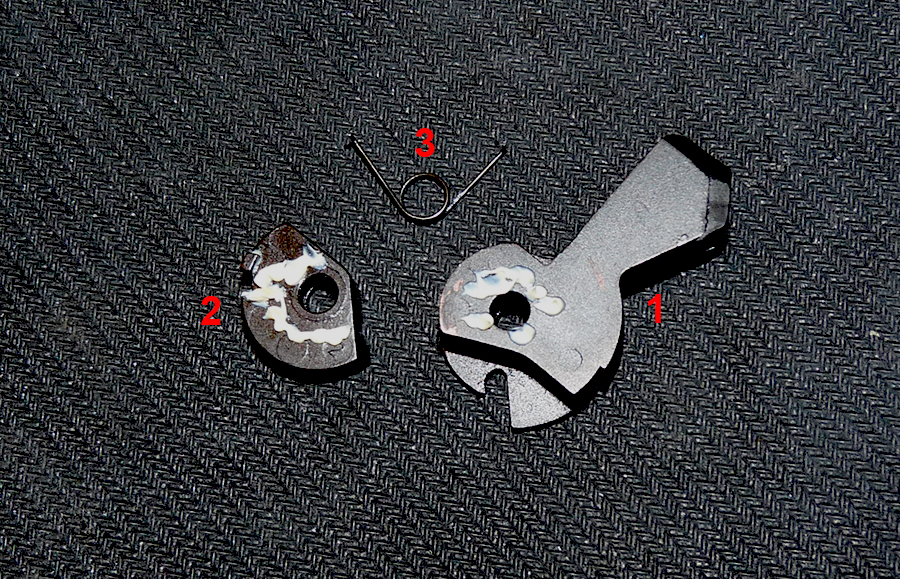
• Remove the Sear Axle, Disconnector, Control Latch/Lever, Catch, and Sear

Parts identification
1. Sear with Decocker
2. Catch
3. Control Latch/Lever
4. Disconnector
5. Sear Axle
Step 6
If you have a P30SKS, skip to step 7
• Turn the frame over so that it lays on its right side
• Locate the Hammer Axle (circled in Red)
• Using the 3/32 punch, push the Hammer Axle towards the right side of the frame, while depressing lightly on the Trigger Bar
• Remove the Hammer Axle, Hammer, and Hammer Strut from the frame
• Go to step 9

Parts identification
1. Hammer Axle
2. Hammer Strut
3. Hammer

Step 7
If you have a P30SK, skip this step
• Look at the bottom of the Left-Side Safety Lever. You'll see a tiny roll pin (circled in Red)
• Flip up the Safety Lever and you'll see a Detent Pin that sits underneath the safety lever (circled in RED in pic #2 below)


• Using the 1/16 roll-pin punch, drive out the tiny roll pin (circled in Red) that holds the Left-Side Safety Lever. Drive out the roll-pin from top down

• Remove the Left-side Safety Lever, then remove the Detent Pin and Detent Pressure Spring located underneath the Safety Lever (circled in Red)

Parts identification
1. Detent Pressure Spring
2. Detent
3. Safety Lever Roll-Pin
4. Left-side Safety Lever

Step 8
• While depressing lightly on the Trigger Bar, either use the 3/32 punch to push out the Ambi Safety Lever Shaft (hammer axle) completely or just grab the Right-Side Safety Lever and pull it off the frame
• Remove the Hammer Axle, Hammer, and Hammer Strut
Parts identification
1. Hammer Axle
2. Hammer Strut
3. Hammer
Step 9
If you are converting to V1 LEM, skip to step 19
• Locate the Trigger Bar and pivot it up towards the front of the frame

• Slightly pull the trigger back then guide the Trigger Bar out of the eyelet on top of the Trigger


Step 10
• Pull out the left-side Slide Release Lever until it stops
• Locate the Trigger Rebound Spring (TRS) in the trigger area. Locate the right leg of the TRS (circled in Red)

Step 11
• Use a small punch to lift the right leg off the groove on the left-side Slide Release Lever and slowly pull out the lever

Step 12
• Pivot the right-side Slide Release Lever up 45 degrees and remove it from the frame
Parts identification
1. Left-side Slide Release Lever
2. Right-side Slide Release Lever

Step 13
• Locate the Trigger Axle on the right side of the frame
• Use the 1/16 punch and push out the Trigger Axle from the right to left side of the frame
• Remove the Hammer Axle and Trigger Rebound Spring (TRS)

Parts identification
1. Trigger Axle
2. Trigger Rebound Spring (TRS)

Step 14
• Grab the V2 or V4/4.1 Trigger Rebound Spring using the TRS Tool (or a pair of thin, needle-nose pliers)

• Sleeve the 1/16 punch through the frame and Trigger's right-side eyelet but do not let the punch protrude past the wall of the frame in the trigger area


Step 15
• Gently insert the Trigger Rebound Spring into the trigger area while keeping the punch and frame still
• While applying a light downward pressure on the Trigger Rebound Spring, push the punch all the way through the Trigger Rebound Spring
• Verify that the right leg of the TRS leans against the frame (circled in Red) while the left leg rests upon the top of the trigger

Step 16
• Insert the Trigger Axle from the left side of the frame and guide it through the TRS, while slowly backing out the punch. Note the thicker end of the Trigger Axle as shown in the picture
• The Trigger Axle may not go through the frame completely at first and you may have to tap it in using a punch
• Verify that the Trigger Axle sits a little below the surface of the left side of the frame
Step 17
If you are not converting to V4.1CH LEM, skip to step 19
• Locate the Trigger Bar Detent on the back of the frame, top of the grip area
• Use the blade of a small, flat-tipped screwdriver or the butt of a punch, push up lightly on the Detent to dislodge it from the frame
• Remove the Trigger Bar Detent and its Spring. Note the orientation of the Detent when it sits on the frame


A comparison of the stock Trigger Bar Detent Spring and the V4.1 Trigger Bar Detent Spring
Step 18
• Assemble the Trigger Bar Detent and V4.1 Trigger Bar Detent Spring
• Grab the assembled Trigger Bar Detent with a small, needle-nose pliers and drop it into its hole on the frame. Pay close attention to the orientation of the Detent due to the irregular shape of the top part of the Detent
• Using the butt of a punch, push down lightly on the top of the Detent until it clicks into the frame
• Verify that the Detent is secured and stays in place even when you turn the frame upside down


Step 19
• Assemble the bobbed LEM hammer (or spurred LEM hammer if you're doing a V0 LEM conversion), cocking piece, and cocking piece spring
1. Bobbed LEM Hammer
2. Cocking Piece
3. Cocking Piece Spring
• Putting a few dabs of grease on the surface of the parts help keep them together
• Note the orientation of the Cocking Piece inside the Hammer and the legs of the Cocking Piece Spring

Parts identification
1. Complete Hammer with Cocking Piece & Cocking Piece Spring
2. Hammer Strut
3. Hammer Axle (or the Ambi Safety Shaft if you have a P30SKS)

Step 20
• Drop the Hammer Strut into the frame and use a rubber band or some painter's tape to keep the Hammer Strut in place

Step 21
• Guide the complete LEM Hammer into the frame. It is easier to lay the frame on its side while slowly inserting the Hammer

Step 22
• Line up the Hammer Axle hole on the Hammer with the hole on the frame, then insert the Hammer Axle (or Ambi Safety Shaft) while depressing lightly on the Trigger Bar. The Trigger Bar needs to be depressed in order to insert the Hammer Axle completely
• If you have a P30SK, make sure the right side of the Hammer Axle is flush against the right side of the frame (circled in Red)

Step 23
If you have a P30SKS, continue with this step. If you have a P30SK, skip to step 24
• Insert the tiny Roll-Pin on the Left-Side Safety Lever and push it in (using the 1/16 roll-pin punch) until it almost sticks out on the inside of the lever (circled in RED)

• Insert the tiny Safety Lever Detent Pin + Spring in the frame cut-out under the Left-Side Safety Lever


• Mount the Left-Side Safety Lever on the Ambi Safety Shaft (aka Hammer Axle)
• Using the 1/16 roll-pin punch, drive the tiny pin on the Left-Side Safety Lever all the way in
Step 24
• The Cocking Piece Spring legs should be visible from inside the frame. Note the orientation of the legs (facing the right side of the frame)

Step 25
• I find it easier to install the following parts in this order:
1. Sear (if you are converting to V0 LEM, you must re-use the V3 Sear with the decocker)
2. Disconnector
3. Control Latch/Lever
4. Catch

• If yours is a P30SKS, it is important that you re-use the V3 Control Latch/Lever to retain the safety function. The Control Latch/Lever on a P30SKS looks a little different than the one on a P30SK. It has a C-hook on one end of the lever.

Step 26
• Locate the legs of the Cocking Piece Spring. Looking down on the Hammer, the bottom leg should be resting against the surface of the Hammer (circled in Yellow) while the other leg is facing the Sear (circled in Red)
• Use the dental pick to pull back on the second leg (compressing the legs) while inserting the Sear. The Sear sits between the Hammer and Flat Sear Spring
• You can also re-use the V3 sear (with decocker) if you do not want a gap on the left side of the hammer (more on that later) or if you are doing a V0 LEM conversion

• Verify that the Cocking Piece Spring and Sear are installed correctly

Step 27
• Insert the Disconnector, Control Latch/Lever, then Catch
• When all 4 parts are installed correctly, sleeve the 3/32 punch from the right side of the frame, through all the parts, until it sticks out on the other side of the frame


Step 28
• Locate the Sear Axle and note the thicker end of the Axle (circled in Red). The other, thinner end will go into the frame first
• Insert the Sear Axle while backing out the punch until the axle goes completely through all the parts. You may need to give it a light tap to seat it fully
• Make sure the Sear Axle is flush against the left side of the frame


Step 29
• Remove the rubber band or painter's tape from the Hammer Strut

• Insert the Hammer Spring onto the Hammer Strut and push the spring all the way up
• Note the cut-out on the Grip Insert (circled in Red). This is where the other end of the Hammer Spring will go

• Line up the Hammer Spring with the cut-out on the Grip Insert, guide the Grip Insert onto the frame, and push it up toward the top of the frame until the catches on the both sides of the Grip Insert lock in the frame

Step 30
• Mount the Backstrap and re-install the Roll-Pin using the 3/32 Roll-Pin Punch


• Congratulations! Your LEM conversion is now complete!
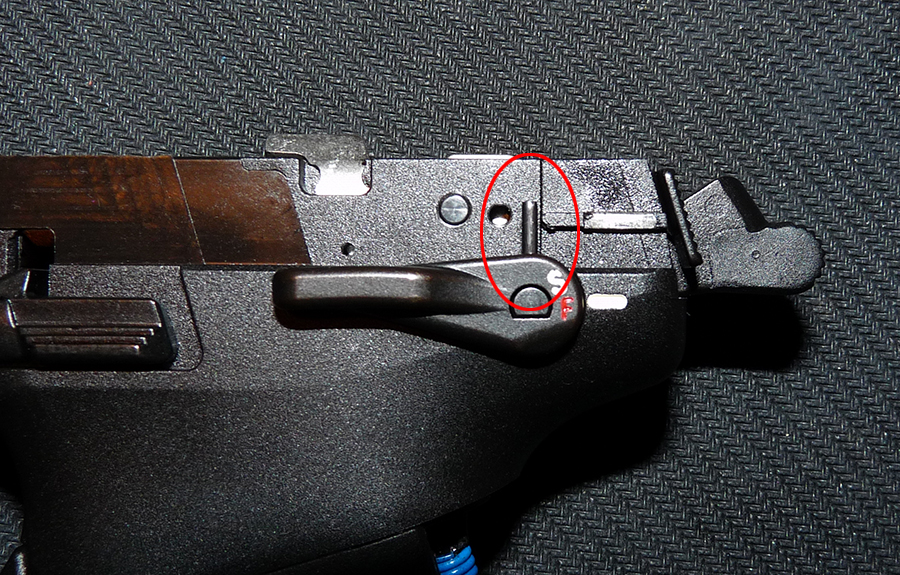
The picture below shows the gap on the frame when the V3 Sear/Decocker is replaced with the LEM Sear. It will work fine like this but if you are not happy with the gap, the solution is to re-use the stock V3 Sear with Decocker.
Note: If you are converting to a V0 LEM, you must re-use the V3 sear with the decocker.

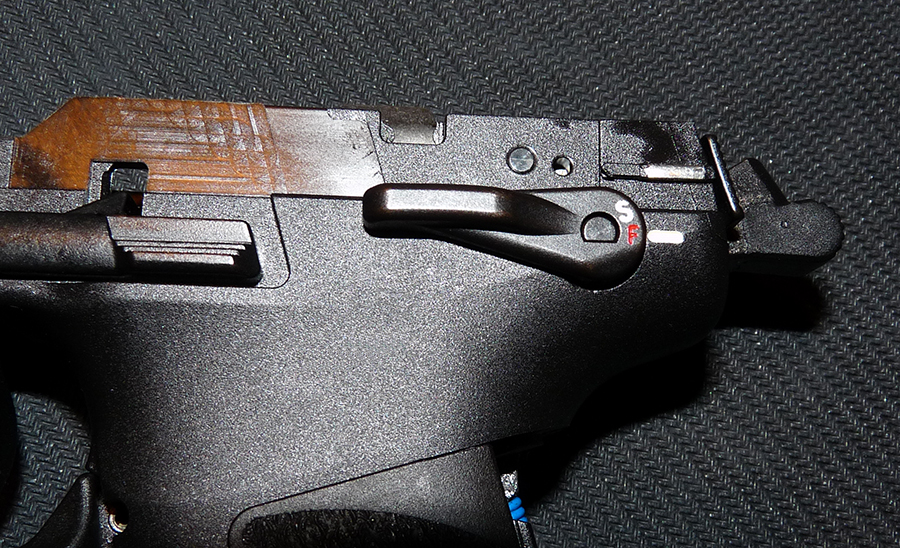
Picture of the V3 Sear with Decocker if you do not like the gap (or if you are converting to a V0 LEM).

There is no official LEM kit for the P-series pistols (due to HK's position on LEM conversions on P-series pistols) but parts can be obtained individually from HK Customer Service, Brownells, MidwestGunWorks, TopGunSupply, Numrich, or HKParts.net. HK Customer Service (706-568-1906) usually have the best prices available.
If you reside within the state of Texas and would like to perform this conversion but feel uneasy about taking apart the pistol and putting everything back together, send me a PM. I might be able to offer some assistance.
Abbreviations
HS = Hammer Spring
FP = Firing Pin
FPS = Firing Pin Spring
FPBS = Firing Pin Block Spring
TRS = Trigger Rebound Spring
TBDS = Trigger Bar Detent Spring
REQUIRED PARTS
1. LEM Bobbed Hammer (209321)
2. LEM Sear - aka Release Catch (209320)
3. LEM Cocking Piece (209265)
4. LEM Control Latch/Lever (209274)
5. LEM Cocking Piece Spring - aka Elbow Spring for Hammer (209275)
V0 LEM (Decocker with a spurred LEM Hammer) option
• Buy the Spurred LEM Hammer (209262)
• Keep the TRS, and Sear from your V3 (DA/SA) pistol
• You will not need the LEM Sear (209320) or bobbed LEM Hammer (209321) as indicated in the parts list above
Below is a photo of the spurred LEM hammer.
V1 LEM (Light LEM) option
• Keep the stock V3 Firing Pin Block Spring (FPBS)
• Keep the stock V3 Elbow Spring for Trigger (TRS)
V2 LEM (Heavy LEM) option
• Keep the V3 (DA/SA) Firing Pin Block Spring (FPBS)
• Buy the Heavy Elbow Spring for Trigger (Heavy TRS - 234405)
V4.1CH LEM (Swiss LEM) option
• You will not need the LEM Bobbed Hammer (209321)
• Keep the V3 (DA/SA) Firing Pin Block Spring (FPBS)
• Buy the V4.1CH LEM Kit (3 separate parts)
• Keep the stock Elbow Spring for Trigger (aka Trigger Rebound Spring or TRS) or buy the Medium TRS (234773) if you want a more positive reset but heavier trigger pull
Regardless of which LEM variant you are converting to, keep the stock Hammer Spring as there is only one spring available for the P30SK series.
Optional Parts
• If you want to reduce the trigger pull weight by an additional 1/2 to 1 lb, replace the stock FPBS with a Light FPBS (209296). A tutorial on how to detail strip the P30SK slide can be found here. Note that you do not need to detail strip the slide to replace the FPBS but due to the recent introduction of the extra Firing Pin Safety on the P30SK, follow the steps in the tutorial to remove and re-install the FPBS correctly
• If you want a clean, crispy trigger break, swap the stock Flat Sear Spring with a Match Nickel-Plated Flat Sear Spring (215691)
Notes on V4.1CH LEM
• You must swap the stock Trigger Bar Detent Spring (TBDS) with the V4.1 TBDS. The stock TBDS does not have enough tension to push up on the Trigger Bar, due to the changed geometry of the V4.1 Hammer and V4.1 Catch. Using the stock TBDS may cause the trigger not resetting properly. If you encounter the trigger reset issue as described in this video, it is caused by using the stock TBDS instead of the V4.1 TBDS.
• If you want V4.1CH LEM with the same V1 Light LEM trigger pull, keep the stock V3 TRS.
• The Medium TRS (234773) is about 0.8 lbs heavier than the stock V3 TRS and is the proper spring for factory V4.1CH LEM
Below are some pictures of the V4.1CH LEM parts and comparison of standard LEM parts versus V4.1CH LEM Parts.
V4.1CH LEM SPECIFIC PARTS
• V4.1 Hammer (207934)
• V4.1 Catch (207933)
• V4.1 Trigger Bar Detent Spring (207932)
• V4/V4.1 Medium-weight TRS (234773) <-- this spring is optional
Comparison of the standard LEM Hammer & Catch versus the V4.1CH LEM Hammer & Catch
Comparison of the stock Trigger Rebound Spring versus V4/V4.1 Trigger Rebound Spring
Comparison of the stock Trigger Bar Detent Spring and V4.1 Trigger Bar Detent Spring
Tools that you'll need
• Dental pick
• 1/16 roll-pin punch (if yours is a P30SKS)
• 3/32 roll-pin punch
• 1/8 punch (optional)
• Small hammer or mallet
If you are going to convert to a V2, V-TGS, V4, or V4.1CH LEM, you will need to swap the TRS and, therefore, will need these tools:
• 1/16 punch
• A pair of thin, needle-nose pliers or the TRS Tool from HKParts (highly recommended)
Step 1
• Remove the magazine and perform a safety check to make sure the gun is safe and unloaded
• Remove the slide
Step 2
• Use the 3/32 roll-pin punch to drive out the roll pin that holds the backstrap. You can use a regular punch but a roll-pin punch will not deform the pin.
• Remove the roll-pin and backstrap
Step 3
• Use the butt of a punch and push up on the Grip Insert to dislodge it from the frame
• Remove the Grip Insert and Hammer Spring
Parts identification
1. Hammer Spring
2. Grip Insert
3. Roll-Pin
Step 4
• Flip the frame over and lay it on its left side. Then locate the Sear Axle (circled in Red)
• Using the 3/32 punch, push the Sear Axle from the right side of the frame to the left. This step is important because the P30 Sear Axle is directional. Forcing it out from the other direction will cause damage to your frame!
Step 5
• Remove the Sear Axle, Disconnector, Control Latch/Lever, Catch, and Sear
Parts identification
1. Sear with Decocker
2. Catch
3. Control Latch/Lever
4. Disconnector
5. Sear Axle
Step 6
If you have a P30SKS, skip to step 7
• Turn the frame over so that it lays on its right side
• Locate the Hammer Axle (circled in Red)
• Using the 3/32 punch, push the Hammer Axle towards the right side of the frame, while depressing lightly on the Trigger Bar
• Remove the Hammer Axle, Hammer, and Hammer Strut from the frame
• Go to step 9
Parts identification
1. Hammer Axle
2. Hammer Strut
3. Hammer
Step 7
If you have a P30SK, skip this step
• Look at the bottom of the Left-Side Safety Lever. You'll see a tiny roll pin (circled in Red)
• Flip up the Safety Lever and you'll see a Detent Pin that sits underneath the safety lever (circled in RED in pic #2 below)
• Using the 1/16 roll-pin punch, drive out the tiny roll pin (circled in Red) that holds the Left-Side Safety Lever. Drive out the roll-pin from top down
• Remove the Left-side Safety Lever, then remove the Detent Pin and Detent Pressure Spring located underneath the Safety Lever (circled in Red)
Parts identification
1. Detent Pressure Spring
2. Detent
3. Safety Lever Roll-Pin
4. Left-side Safety Lever
Step 8
• While depressing lightly on the Trigger Bar, either use the 3/32 punch to push out the Ambi Safety Lever Shaft (hammer axle) completely or just grab the Right-Side Safety Lever and pull it off the frame
• Remove the Hammer Axle, Hammer, and Hammer Strut
Parts identification
1. Hammer Axle
2. Hammer Strut
3. Hammer
Step 9
If you are converting to V1 LEM, skip to step 19
• Locate the Trigger Bar and pivot it up towards the front of the frame
• Slightly pull the trigger back then guide the Trigger Bar out of the eyelet on top of the Trigger
Step 10
• Pull out the left-side Slide Release Lever until it stops
• Locate the Trigger Rebound Spring (TRS) in the trigger area. Locate the right leg of the TRS (circled in Red)
Step 11
• Use a small punch to lift the right leg off the groove on the left-side Slide Release Lever and slowly pull out the lever
Step 12
• Pivot the right-side Slide Release Lever up 45 degrees and remove it from the frame
Parts identification
1. Left-side Slide Release Lever
2. Right-side Slide Release Lever
Step 13
• Locate the Trigger Axle on the right side of the frame
• Use the 1/16 punch and push out the Trigger Axle from the right to left side of the frame
• Remove the Hammer Axle and Trigger Rebound Spring (TRS)
Parts identification
1. Trigger Axle
2. Trigger Rebound Spring (TRS)
Step 14
• Grab the V2 or V4/4.1 Trigger Rebound Spring using the TRS Tool (or a pair of thin, needle-nose pliers)
• Sleeve the 1/16 punch through the frame and Trigger's right-side eyelet but do not let the punch protrude past the wall of the frame in the trigger area
Step 15
• Gently insert the Trigger Rebound Spring into the trigger area while keeping the punch and frame still
• While applying a light downward pressure on the Trigger Rebound Spring, push the punch all the way through the Trigger Rebound Spring
• Verify that the right leg of the TRS leans against the frame (circled in Red) while the left leg rests upon the top of the trigger
Step 16
• Insert the Trigger Axle from the left side of the frame and guide it through the TRS, while slowly backing out the punch. Note the thicker end of the Trigger Axle as shown in the picture
• The Trigger Axle may not go through the frame completely at first and you may have to tap it in using a punch
• Verify that the Trigger Axle sits a little below the surface of the left side of the frame
Step 17
If you are not converting to V4.1CH LEM, skip to step 19
• Locate the Trigger Bar Detent on the back of the frame, top of the grip area
• Use the blade of a small, flat-tipped screwdriver or the butt of a punch, push up lightly on the Detent to dislodge it from the frame
• Remove the Trigger Bar Detent and its Spring. Note the orientation of the Detent when it sits on the frame
A comparison of the stock Trigger Bar Detent Spring and the V4.1 Trigger Bar Detent Spring
Step 18
• Assemble the Trigger Bar Detent and V4.1 Trigger Bar Detent Spring
• Grab the assembled Trigger Bar Detent with a small, needle-nose pliers and drop it into its hole on the frame. Pay close attention to the orientation of the Detent due to the irregular shape of the top part of the Detent
• Using the butt of a punch, push down lightly on the top of the Detent until it clicks into the frame
• Verify that the Detent is secured and stays in place even when you turn the frame upside down
Step 19
• Assemble the bobbed LEM hammer (or spurred LEM hammer if you're doing a V0 LEM conversion), cocking piece, and cocking piece spring
1. Bobbed LEM Hammer
2. Cocking Piece
3. Cocking Piece Spring
• Putting a few dabs of grease on the surface of the parts help keep them together
• Note the orientation of the Cocking Piece inside the Hammer and the legs of the Cocking Piece Spring
Parts identification
1. Complete Hammer with Cocking Piece & Cocking Piece Spring
2. Hammer Strut
3. Hammer Axle (or the Ambi Safety Shaft if you have a P30SKS)
Step 20
• Drop the Hammer Strut into the frame and use a rubber band or some painter's tape to keep the Hammer Strut in place
Step 21
• Guide the complete LEM Hammer into the frame. It is easier to lay the frame on its side while slowly inserting the Hammer
Step 22
• Line up the Hammer Axle hole on the Hammer with the hole on the frame, then insert the Hammer Axle (or Ambi Safety Shaft) while depressing lightly on the Trigger Bar. The Trigger Bar needs to be depressed in order to insert the Hammer Axle completely
• If you have a P30SK, make sure the right side of the Hammer Axle is flush against the right side of the frame (circled in Red)
Step 23
If you have a P30SKS, continue with this step. If you have a P30SK, skip to step 24
• Insert the tiny Roll-Pin on the Left-Side Safety Lever and push it in (using the 1/16 roll-pin punch) until it almost sticks out on the inside of the lever (circled in RED)
• Insert the tiny Safety Lever Detent Pin + Spring in the frame cut-out under the Left-Side Safety Lever
• Mount the Left-Side Safety Lever on the Ambi Safety Shaft (aka Hammer Axle)
• Using the 1/16 roll-pin punch, drive the tiny pin on the Left-Side Safety Lever all the way in
Step 24
• The Cocking Piece Spring legs should be visible from inside the frame. Note the orientation of the legs (facing the right side of the frame)
Step 25
• I find it easier to install the following parts in this order:
1. Sear (if you are converting to V0 LEM, you must re-use the V3 Sear with the decocker)
2. Disconnector
3. Control Latch/Lever
4. Catch
• If yours is a P30SKS, it is important that you re-use the V3 Control Latch/Lever to retain the safety function. The Control Latch/Lever on a P30SKS looks a little different than the one on a P30SK. It has a C-hook on one end of the lever.
Step 26
• Locate the legs of the Cocking Piece Spring. Looking down on the Hammer, the bottom leg should be resting against the surface of the Hammer (circled in Yellow) while the other leg is facing the Sear (circled in Red)
• Use the dental pick to pull back on the second leg (compressing the legs) while inserting the Sear. The Sear sits between the Hammer and Flat Sear Spring
• You can also re-use the V3 sear (with decocker) if you do not want a gap on the left side of the hammer (more on that later) or if you are doing a V0 LEM conversion
• Verify that the Cocking Piece Spring and Sear are installed correctly
Step 27
• Insert the Disconnector, Control Latch/Lever, then Catch
• When all 4 parts are installed correctly, sleeve the 3/32 punch from the right side of the frame, through all the parts, until it sticks out on the other side of the frame
Step 28
• Locate the Sear Axle and note the thicker end of the Axle (circled in Red). The other, thinner end will go into the frame first
• Insert the Sear Axle while backing out the punch until the axle goes completely through all the parts. You may need to give it a light tap to seat it fully
• Make sure the Sear Axle is flush against the left side of the frame
Step 29
• Remove the rubber band or painter's tape from the Hammer Strut
• Insert the Hammer Spring onto the Hammer Strut and push the spring all the way up
• Note the cut-out on the Grip Insert (circled in Red). This is where the other end of the Hammer Spring will go
• Line up the Hammer Spring with the cut-out on the Grip Insert, guide the Grip Insert onto the frame, and push it up toward the top of the frame until the catches on the both sides of the Grip Insert lock in the frame
Step 30
• Mount the Backstrap and re-install the Roll-Pin using the 3/32 Roll-Pin Punch
• Congratulations! Your LEM conversion is now complete!
The picture below shows the gap on the frame when the V3 Sear/Decocker is replaced with the LEM Sear. It will work fine like this but if you are not happy with the gap, the solution is to re-use the stock V3 Sear with Decocker.
Note: If you are converting to a V0 LEM, you must re-use the V3 sear with the decocker.
Picture of the V3 Sear with Decocker if you do not like the gap (or if you are converting to a V0 LEM).
