Need technical advice on an HK SL6

PSPSgt

New member
Joined
Jun 18, 2025
Posts
4
Feedback: 0 / 0 / 0
Hi guys, I'm new to the forums and trying to find anyone knowledgeable on the HK SL6 rifle as far as detailed disassembly.

I bought an SL6 from an out of state FFL who said he was selling the rifle on consignment for someone. The price was kinda high, but they threw in a bunch of mags and an 05 scope mount with rings.

Well the rifle shows up today, I get it home, and it doesn't work. Action cycles fine, it cocks the bolt, pull the trigger and nothing. Safety position doesn't matter, on or off, the trigger always feels the same. No tension, slack, with about a 1/2 inch of travel. I'm guessing there's a problem in the trigger pack with the trigger not releasing the sear to let the hammer fall. I can't see any outward signs of damage but something isn't right. And of course, the FFL who sold it to me says he had no idea it didn't work.

The owner's manual only shows basic break down and doesn't cover removal of the trigger pack from the stock. From the way it's designed it looks like the safety lever definitely has to come out (along with a top screw) to release the trigger pack from the stock. I just don't know what position the safety needs to be in when you pull it out, For example do I pull it up and rotate clockwise, or counterclockwise a quarter turn and then remove, etc. Also I don't know if the axel of the lever is holding anything else in place I need to be aware of before removing it. I just don't want to damage anything further not knowing what I'm doing,

I'm sure HK won't be any help in this situation as this platform is long off their radar. I figure the best option is to ask someone else who owns one or who has worked on them. So If anyone has removed an SL6 trigger pack in the past I sure could use some advice. Once I get the pack out then that will be a whole different conundrum as there are no schematics of the SL6 trigger pack. I was kinda surprised there are no YouTube videos of deep dive disassembly on this rifle.

Anyway, thank you in advance for any help you can provide.
 
I unfortunately cannot help you, but welcome to the site!
I am sure someone will be along shortly that can point you in the right right direction.

M.
 
Welcome to the site. :)
I could not find an SL6 assembly/disassembly video per se either, but was able to find this exploded drawing schematic, which may be helpful: ;)


This is a static HK300 disassembly page (I would believe that the disassembly is similar), possibly helpful: :unsure:


Be patient--- one of our SL6 experts will respond soon. :giggle:

Tony
 
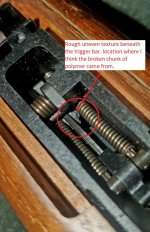
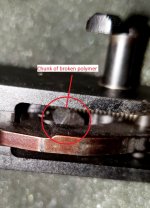
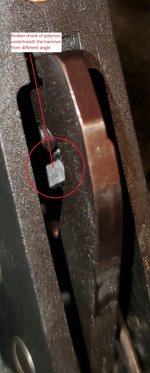
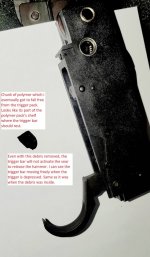
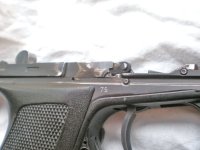
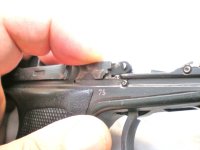
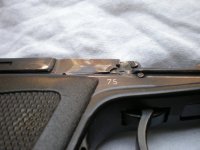
Thank you for the reply guys and the welcomes. And thank you for the schematic AGG, I've seen that one but unfortunately it doesn't covert the trigger pack internals. I did manage to get the trigger pack out this morning. It was a matter of pulling the safety lever out enough to clear the stock and rotating it to the 12 o'clock position and then pulling straight out. Once I got the pack out, I found a chunk of polymer under the hammer which I eventually got to fall free from the pack. It wasn't binding up the hammer just floating free. It looks like a piece of the polymer housing from beneath the trigger bar. And directly under the trigger bar the polymer looks rough and uneven. This would explain why the trigger bar wont trip the sear to release the hammer. The guy who gave this to the FFL to sell for him had to know. This gun was broken the last time it was shot and then put away. The bolt looked like it hadn't ever been cleaned, it was caked with years old black crud. Not sure what I'll do now. Even if there was a schematic to disassemble the trigger pack, I'm not sure it could be fixed anyway. It's part of the polymer housing itself that's broken I believe. I'll attach a few pics of what I found. And thanks again for the replies.
 

Attachments

  • 20250618_182029.jpg
    20250618_182029.jpg
    152.3 KB · Views: 9
  • 20250619_053530.jpg
    20250619_053530.jpg
    235.9 KB · Views: 9
  • 20250619_053538.jpg
    20250619_053538.jpg
    83.5 KB · Views: 8
  • 20250619_053838.jpg
    20250619_053838.jpg
    118.7 KB · Views: 9
I agree, the owner had to know. The FFL probably not. The gun was possibly given to the FFL to sell for that reason, after all we have GunBroker, nothing prevents the owner from selling it himself. Except wanting not to have this conversation with you personally.

A few of H&K's designs from that era need polymer buffers that protect the gun from bad things happening. Don't replace the buffer when it needs it, bad things happen. I don't know that that is the case here, only mentioning it as a possibility as to why this happened. The SL6-SL7 both have buffers, so does the P9S and the HK4. I bought a P9S at auction in Germany that had a cracked frame. It's only made of sheet metal, the buffer is designed to take a lot of the force that allows that design feature. It had been worked on, there was an attempt to limit further cracking by drilling a very small hole at the end of it so it could not progress further and then brazing it. That did not work, it cracked again. No way the seller didn't know. Fucker. I did get my money back by stripping the fame and parting the gun out, which is obviously not really an option here unfortunately. You state that the gun has been shot extensively and not cleaned, it's possible that a combination of age, use, gun solvent etc degraded the polymer buffer to the point where it was no longer doing it's job. How that translates to impact by the trigger bar to carve out that chunk of poly I honestly don't know, I'm just speculating. Have you inspected the buffer? A new one can be obtained.

There's a way to fix anything that is manufactured. My best suggestion, not that it will make you happy, is to strip it completely and have a new trigger housing manufactured. Yeah, I know.......that might not even be possible with conventional machine tools depending on the design. 3D printing does things that conventional machine tools can't but then we get into cost being prohibitive. You are probably right about H&K Oberndorf not being able to help, but it never hurts to ask. You never know. I'm sorry not to be able to be of more help at this point, but I can ask someone over there who has good connects at the factory to make inquiry and will do so.
 

Attachments

  • Cracked P9S frame 001.JPG
    Cracked P9S frame 001.JPG
    106.9 KB · Views: 8
  • Cracked P9S frame 002.JPG
    Cracked P9S frame 002.JPG
    91 KB · Views: 8
  • Cracked P9S frame 003.JPG
    Cracked P9S frame 003.JPG
    105.9 KB · Views: 8
Hi Lamont, ya the FFL was a nice guy to deal with. I agree with your assessment. The rubber recoil buffer does need replacing. It's not disintegrating, seems like it's still rubbery and pliable, but it does have a chunk out of it on the top left. So I'll order a new one. I was surprised this trigger housing is polymer, others I've seen are all steel. This is an early Chantilly VA gun with a 4 digit serial number, so maybe they switched to an all-steel design later after having polymer issues like I'm having. That sucks you had to part out that PS9, shame there are so many dishonest people.

Today I was able to source an all steel trigger pack, so we'll see if that works when it comes. Looks a bit different but the dimensions look right. As far as fixing the old one. I guess it could be 3D printed but it appears there are some axle pin holes with steel sleeves that would need to be removed from the old pack and press fit into a new one. I'll wait and see if the all steel one works and then I may take a stab at disassembling the old trigger pack. Definitely an armorer level job and with no diagram or exploded view it's walking in the dark. I've been an HK LE armorer for years (have visited the grey room multiple times) for the G3, HK33, 416, 762, MP5 series, and all of the pistol series except the new one. But I never had any experience with the SL rifles. And after working on things like burst trigger packs, which I felt were the most complicated taking apart and putting back together, I've learned you need the right tools, sometimes specialized tools, and need to know small installation tricks to prevent either breaking something or making the job 10 times harder on yourself by assembling something wrong that then does not want to come apart. If the new pack works and the old one can't, at least I can cannibalize the old pack for the spare parts (Hammer, sear, trigger bar, springs, etc).

I've been thinking now since the SL6 is completely torn down on my kitchen island I should either take pictures or video for a tutorial maybe that will help someone else one day if they need to break it down as far as changing out a stock or trigger pack. I'll let you know what pans put eventually.

Thanks!
 
You are very welcome--- apologies for not being more helpful. :(
Return to the seller, unless you want to keep it. ;)
Or maybe contact James Williamson here: :unsure:


Tony
 
Hi Lamont, ya the FFL was a nice guy to deal with. I agree with your assessment. The rubber recoil buffer does need replacing. It's not disintegrating, seems like it's still rubbery and pliable, but it does have a chunk out of it on the top left. So I'll order a new one. I was surprised this trigger housing is polymer, others I've seen are all steel. This is an early Chantilly VA gun with a 4 digit serial number, so maybe they switched to an all-steel design later after having polymer issues like I'm having. That sucks you had to part out that PS9, shame there are so many dishonest people.

Today I was able to source an all steel trigger pack, so we'll see if that works when it comes. Looks a bit different but the dimensions look right. As far as fixing the old one. I guess it could be 3D printed but it appears there are some axle pin holes with steel sleeves that would need to be removed from the old pack and press fit into a new one. I'll wait and see if the all steel one works and then I may take a stab at disassembling the old trigger pack. Definitely an armorer level job and with no diagram or exploded view it's walking in the dark. I've been an HK LE armorer for years (have visited the grey room multiple times) for the G3, HK33, 416, 762, MP5 series, and all of the pistol series except the new one. But I never had any experience with the SL rifles. And after working on things like burst trigger packs, which I felt were the most complicated taking apart and putting back together, I've learned you need the right tools, sometimes specialized tools, and need to know small installation tricks to prevent either breaking something or making the job 10 times harder on yourself by assembling something wrong that then does not want to come apart. If the new pack works and the old one can't, at least I can cannibalize the old pack for the spare parts (Hammer, sear, trigger bar, springs, etc).

I've been thinking now since the SL6 is completely torn down on my kitchen island I should either take pictures or video for a tutorial maybe that will help someone else one day if they need to break it down as far as changing out a stock or trigger pack. I'll let you know what pans put eventually.

Thanks!
Wow, found an all steel trigger pack, and that quickly? Sweet. You're GTG.

For all the hundreds of guns I've imported, that's really the only one I had a serious issue with, and it was actually a long time ago, but I still had the pics.

Agree with your idea of doing a tutorial, it's virtually certain to help someone else down the road, AGG will "sticky" it, and of course it will apply to the SL7 as well, so "bonus".
 
The pack arrived overnight by FedEx, pretty amazed it reached me that fast. Spent the day performing a deep dive cleaning of all parts, then installed the pack, linseed oiled the stock and finished up with a coating of renaissance wax on all exterior metal. Reassembled it and everything is functioning as it should. Hopefully get time to test fire this weekend. Almost hate to shoot it now that it it's so clean lol.

And AGG thanks for the contact info for James.
 
The pack arrived overnight by FedEx, pretty amazed it reached me that fast. Spent the day performing a deep dive cleaning of all parts, then installed the pack, linseed oiled the stock and finished up with a coating of renaissance wax on all exterior metal. Reassembled it and everything is functioning as it should. Hopefully get time to test fire this weekend. Almost hate to shoot it now that it it's so clean lol.

And AGG thanks for the contact info for James.

You're welcome. :)
And per the recommendation of @Lamont, I will "Sticky" any assembly/disassembly pictures/videos. ;)

Tony
 
Back
Top