This short guide will show you how to convert a V3 (DA/SA) P2000SK to a LEM. You can have a V0 LEM (Decocker with a spurred LEM Hammer), V1 (Light), or V2 (Heavy) LEM. Though not officially supported by HK, it's an easy conversion that you can do yourself with a few parts and tools.
There is no official LEM kit for the P-series pistols (due to HK's position on LEM conversion on P-series pistols) but parts can be obtained individually from HK Customer Service (706-568-1906), HKWebshop, MidwestGunWorks, TopGunSupply, Brownells, Numrich, or HKParts.
Note: This guide will also work with a P2000 because both pistols are identical.
If you are a resident of Texas and would like to perform this conversion but feel uneasy about taking apart the pistol and putting everything back together, send me a PM. I might be able to offer some assistance.
Abbreviations
HS = Hammer Spring
FP = Firing Pin
FPBS = Firing Pin Block Spring
TRS = Trigger Rebound Spring
TBDS = Trigger Bar Detent Spring
PARTS REQUIRED
• LEM Sear (209320)
• LEM Bobbed Hammer (209321)
• LEM Cocking Piece (209265)
• LEM Cocking Piece Spring (209275)
If you want a V0 LEM (Decocker with a spurred LEM Hammer), keep the HS, TRS, and Sear from your V3 (DA/SA) pistol. You will not need the LEM Sear (209320) and Bobbed LEM Hammer (209321) as indicated in the parts list above. You will need this spurred LEM hammer:
• Spurred LEM Hammer (209262)
Below is a photo of the spurred LEM hammer.

If you want a V1 (Light) LEM, keep both HS and TRS that came with your V3 (DA/SA) pistol and get this spring:
• Light FPBS (209296)
If you want a V2 (Heavy) LEM, keep both HS and FPBS that came with your V3 (DA/SA) pistol and get this spring:
• Heavy TRS (219441)
• Heavy HS (214695) only if you have a P2000 (not a P2000SK)
If you want any other LEM variants (V4 or Todd Green), see this Springs Chart for the required parts.

TOOLS REQUIRED
• Dental pick
• 3/32 roll-pin punch
• 3/32 punch (optional)
• 1/8 punch (optional)
• Small hammer or mallet
If you are going to convert to a V2 LEM, you'll need to swap the TRS and, therefore, will need these tools:
• 1/16 punch
• Thin, long needle-nose pliers or this TRS Tool from HKParts
• Vise (recommended)

DISASSEMBLY
Step 1
• Use the 3/32 roll-pin punch to drive out the pin that holds the backstrap in place. You can use a regular punch but a roll-pin punch will not deform the pin.

Step 2
• Remove the backstrap and hammer spring
• Don't remove the hammer strut from the frame

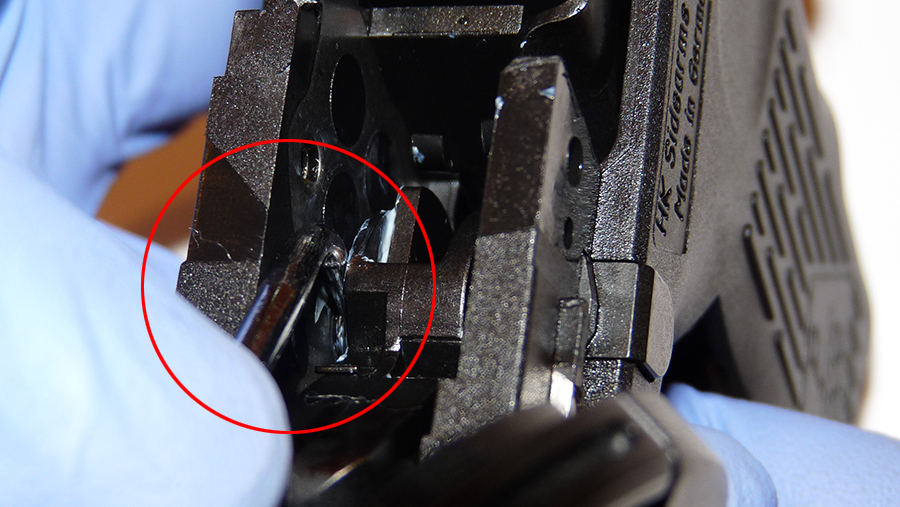
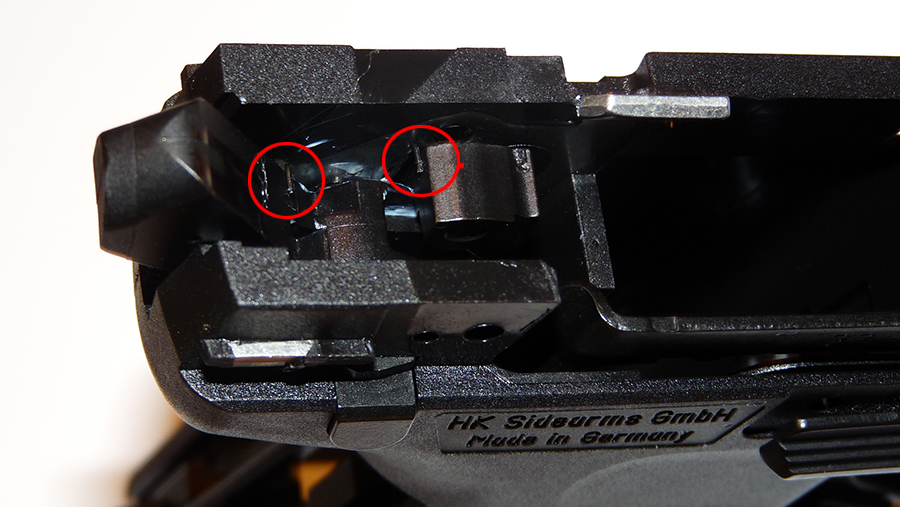
Step 3
• Use the 3/32 punch to push out the sear axle (circled in RED)
• Remove the sear, catch, sear actuator latch (aka control latch), and disconnector
• With the 3/32 or 1/8 punch, while depressing lightly on the trigger bar, push out the hammer axle (circled in GREEN) and remove the hammer
• The hammer strut does not have to come out

Step 4
The following V3 (DA/SA) parts will be re-used to install LEM
• Sear actuator latch
• Catch
• Sear axle
• Disconnector
• Optional: Sear with decocker (if you want to retain the decocker, similar to European V0 LEM)

REASSEMBLY
• If you removed the hammer strut in step 3, re-insert it back into the frame. I find it easier to tape the hammer strut to the frame (using painter's tape or a rubber band) to prevent it from moving around while you are re-assembling the hammer parts

Step 5
• Assemble the bobbed LEM hammer (or spurred LEM hammer if you're doing a V0 LEM conversion), cocking piece, and cocking piece spring. Note the orientation of the cocking piece going inside the hammer. It helps to use a little lube or grease to hold these parts together.
• Note the orientation of the cocking piece spring as well.


Step 6
• Laying the frame on its right side, guide the completely assembled hammer into the frame
• Insert the hammer axle into the hammer axle hole on the frame (from the right side) while depressing on the trigger bar. Part of the trigger bar is blocking the hammer axle hole so depressing on the trigger bar will make it easier to insert the hammer axle.
• Push the axle thru the hammer/cocking piece/cocking piece spring until it sits flush with the left side of the frame
Step 7
• Lube or oil lightly the sear
• Locate the legs of the cocking piece spring. One leg will rest upon the hammer.
• Use the dental pick to pull back the 2nd leg of the cocking piece spring and insert the LEM sear in the opening between the flat spring and the leg that you are holding.
• You can also re-use the V3 sear (with decocker) if you do not want a gap on the left side of the hammer (more on that later) or if you are doing a V0 LEM conversion
Step 8
• Both legs of the cocking piece spring should look like this; one resting upon the hammer while the other is resting against the face of the sear
Step 9
• I find it easier to install the next parts in this order (1 thru 3 in the picture below): Disconnector --> Catch --> Control Latch
• Guide the 3/32 punch from the right side of the frame thru the Disconnector --> Control Latch --> Catch until it sticks out on the left side of frame
• Insert the sear axle (from the left side of frame), pushing the punch back out (to the right side of frame) until the sear axle sits flush with the frame

• When all parts have been re-installed, the hammer group should look like this

Step 10
• Lube or oil lightly the hammer strut and hammer spring
• Push up on the hammer strut to make sure it sits correctly in the opening under the hammer (pic #1)
• If the strut and spring are oriented like pic #2, it is wrong! The strut should be pushed up to recess inside the opening (pic #1)


Step 11
• Insert the backstrap, push it up toward the hammer and apply pressure to hold it still. You will feel a little tension because the hammer spring rests on the backstrap so in reality you are compressing the hammer spring while doing this
• While pushing up on the backstrap, line up the backstrap pin hole and tap in the backstrap roll-pin until it sits evenly inside the cavity
Step 12
• If you are converting to a V1 (Light) LEM, the next step is to swap out the V3 (DA/SA) Firing Pin Block Spring (FPBS) for the Light FPBS
Step 13
• If you are converting to a V2 (Heavy) LEM, the next step is to swap out the V3 (DA/SA) Trigger Rebound Spring (TRS) for the Heavy TRS
After the conversion is done, you will end up with a little gap on the left side of the hammer.


If you want, you can re-use the original V3 (DA/SA) sear with the decocker. There won't be a gap and the decocker can be used to release tension on the cocking piece & hammer springs (useful in certain situations like before holstering the pistol).
If you are converting to a V0 LEM, you must keep the V3 sear with the decocker.

There is no official LEM kit for the P-series pistols (due to HK's position on LEM conversion on P-series pistols) but parts can be obtained individually from HK Customer Service (706-568-1906), HKWebshop, MidwestGunWorks, TopGunSupply, Brownells, Numrich, or HKParts.
Note: This guide will also work with a P2000 because both pistols are identical.
If you are a resident of Texas and would like to perform this conversion but feel uneasy about taking apart the pistol and putting everything back together, send me a PM. I might be able to offer some assistance.
Abbreviations
HS = Hammer Spring
FP = Firing Pin
FPBS = Firing Pin Block Spring
TRS = Trigger Rebound Spring
TBDS = Trigger Bar Detent Spring
PARTS REQUIRED
• LEM Sear (209320)
• LEM Bobbed Hammer (209321)
• LEM Cocking Piece (209265)
• LEM Cocking Piece Spring (209275)
If you want a V0 LEM (Decocker with a spurred LEM Hammer), keep the HS, TRS, and Sear from your V3 (DA/SA) pistol. You will not need the LEM Sear (209320) and Bobbed LEM Hammer (209321) as indicated in the parts list above. You will need this spurred LEM hammer:
• Spurred LEM Hammer (209262)
Below is a photo of the spurred LEM hammer.
If you want a V1 (Light) LEM, keep both HS and TRS that came with your V3 (DA/SA) pistol and get this spring:
• Light FPBS (209296)
If you want a V2 (Heavy) LEM, keep both HS and FPBS that came with your V3 (DA/SA) pistol and get this spring:
• Heavy TRS (219441)
• Heavy HS (214695) only if you have a P2000 (not a P2000SK)
If you want any other LEM variants (V4 or Todd Green), see this Springs Chart for the required parts.
TOOLS REQUIRED
• Dental pick
• 3/32 roll-pin punch
• 3/32 punch (optional)
• 1/8 punch (optional)
• Small hammer or mallet
If you are going to convert to a V2 LEM, you'll need to swap the TRS and, therefore, will need these tools:
• 1/16 punch
• Thin, long needle-nose pliers or this TRS Tool from HKParts
• Vise (recommended)
DISASSEMBLY
Step 1
• Use the 3/32 roll-pin punch to drive out the pin that holds the backstrap in place. You can use a regular punch but a roll-pin punch will not deform the pin.
Step 2
• Remove the backstrap and hammer spring
• Don't remove the hammer strut from the frame
Step 3
• Use the 3/32 punch to push out the sear axle (circled in RED)
• Remove the sear, catch, sear actuator latch (aka control latch), and disconnector
• With the 3/32 or 1/8 punch, while depressing lightly on the trigger bar, push out the hammer axle (circled in GREEN) and remove the hammer
• The hammer strut does not have to come out
Step 4
The following V3 (DA/SA) parts will be re-used to install LEM
• Sear actuator latch
• Catch
• Sear axle
• Disconnector
• Optional: Sear with decocker (if you want to retain the decocker, similar to European V0 LEM)
REASSEMBLY
• If you removed the hammer strut in step 3, re-insert it back into the frame. I find it easier to tape the hammer strut to the frame (using painter's tape or a rubber band) to prevent it from moving around while you are re-assembling the hammer parts
Step 5
• Assemble the bobbed LEM hammer (or spurred LEM hammer if you're doing a V0 LEM conversion), cocking piece, and cocking piece spring. Note the orientation of the cocking piece going inside the hammer. It helps to use a little lube or grease to hold these parts together.
• Note the orientation of the cocking piece spring as well.
Step 6
• Laying the frame on its right side, guide the completely assembled hammer into the frame
• Insert the hammer axle into the hammer axle hole on the frame (from the right side) while depressing on the trigger bar. Part of the trigger bar is blocking the hammer axle hole so depressing on the trigger bar will make it easier to insert the hammer axle.
• Push the axle thru the hammer/cocking piece/cocking piece spring until it sits flush with the left side of the frame
Step 7
• Lube or oil lightly the sear
• Locate the legs of the cocking piece spring. One leg will rest upon the hammer.
• Use the dental pick to pull back the 2nd leg of the cocking piece spring and insert the LEM sear in the opening between the flat spring and the leg that you are holding.
• You can also re-use the V3 sear (with decocker) if you do not want a gap on the left side of the hammer (more on that later) or if you are doing a V0 LEM conversion
Step 8
• Both legs of the cocking piece spring should look like this; one resting upon the hammer while the other is resting against the face of the sear
Step 9
• I find it easier to install the next parts in this order (1 thru 3 in the picture below): Disconnector --> Catch --> Control Latch
• Guide the 3/32 punch from the right side of the frame thru the Disconnector --> Control Latch --> Catch until it sticks out on the left side of frame
• Insert the sear axle (from the left side of frame), pushing the punch back out (to the right side of frame) until the sear axle sits flush with the frame
• When all parts have been re-installed, the hammer group should look like this
Step 10
• Lube or oil lightly the hammer strut and hammer spring
• Push up on the hammer strut to make sure it sits correctly in the opening under the hammer (pic #1)
• If the strut and spring are oriented like pic #2, it is wrong! The strut should be pushed up to recess inside the opening (pic #1)
Step 11
• Insert the backstrap, push it up toward the hammer and apply pressure to hold it still. You will feel a little tension because the hammer spring rests on the backstrap so in reality you are compressing the hammer spring while doing this
• While pushing up on the backstrap, line up the backstrap pin hole and tap in the backstrap roll-pin until it sits evenly inside the cavity
Step 12
• If you are converting to a V1 (Light) LEM, the next step is to swap out the V3 (DA/SA) Firing Pin Block Spring (FPBS) for the Light FPBS
Step 13
• If you are converting to a V2 (Heavy) LEM, the next step is to swap out the V3 (DA/SA) Trigger Rebound Spring (TRS) for the Heavy TRS
After the conversion is done, you will end up with a little gap on the left side of the hammer.
If you want, you can re-use the original V3 (DA/SA) sear with the decocker. There won't be a gap and the decocker can be used to release tension on the cocking piece & hammer springs (useful in certain situations like before holstering the pistol).
If you are converting to a V0 LEM, you must keep the V3 sear with the decocker.
