Part 5 - Slide Disassembly
Step 1
• Remove the slide from the frame
• Remove the Recoil Spring Assembly and Barrel from the slide

Step 2
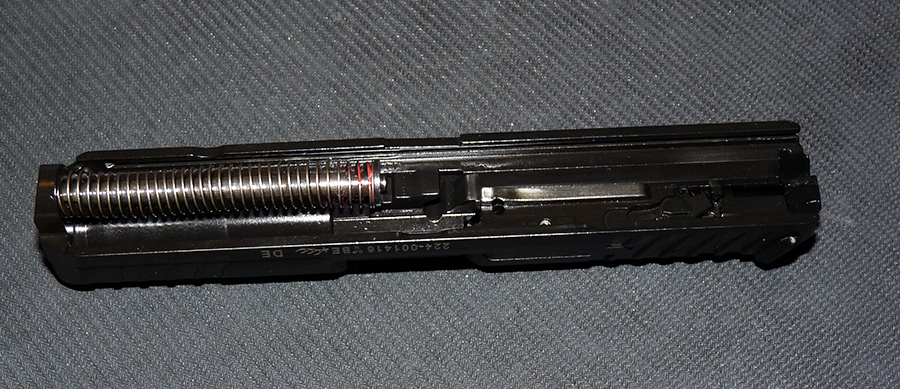
• Locate the Support Sleeve (circled in Red) and, using a small, flat-tipped screwdriver, compress the Support Sleeve (push it towards the left in the picture). Notes: using the blade of a small, flat-tipped screwdriver minimizes the chance of deforming the Support Sleeve
• While compressing the Support Sleeve, slide the Striker Slide Plate up to remove it from the slide


Step 3
• Remove the complete Firing Pin Assembly from the slide
Parts identification
1. Slide Plate
2. Firing Pin Assembly


Part 6 - Slide Reassembly
Step 1
• Insert the Firing Pin Assembly into the slide as shown


Step 2
• Locate the Support Sleeve (circled in Red) and, using the blade of the flat-tipped screwdriver, compress it
• Install the Slide Plate by sliding it into the groove on the slide


Step 3
• Insert the Barrel and Recoil Spring Assembly
• Make sure the Recoil Spring Assembly is installed correctly (note the orientation of the Recoil Spring Assembly)


Step 4
• Install the slide. Make sure to push down on the rear of the slide when it reaches the rear of the frame
• Flip the Disassembly Lever to lock the slide in place

Step 1
• Remove the slide from the frame
• Remove the Recoil Spring Assembly and Barrel from the slide
Step 2
• Locate the Support Sleeve (circled in Red) and, using a small, flat-tipped screwdriver, compress the Support Sleeve (push it towards the left in the picture). Notes: using the blade of a small, flat-tipped screwdriver minimizes the chance of deforming the Support Sleeve
• While compressing the Support Sleeve, slide the Striker Slide Plate up to remove it from the slide
Step 3
• Remove the complete Firing Pin Assembly from the slide
Parts identification
1. Slide Plate
2. Firing Pin Assembly
Part 6 - Slide Reassembly
Step 1
• Insert the Firing Pin Assembly into the slide as shown
Step 2
• Locate the Support Sleeve (circled in Red) and, using the blade of the flat-tipped screwdriver, compress it
• Install the Slide Plate by sliding it into the groove on the slide
Step 3
• Insert the Barrel and Recoil Spring Assembly
• Make sure the Recoil Spring Assembly is installed correctly (note the orientation of the Recoil Spring Assembly)
Step 4
• Install the slide. Make sure to push down on the rear of the slide when it reaches the rear of the frame
• Flip the Disassembly Lever to lock the slide in place
